Overscan is a common issue where the edges of the screen are cut off, making part of the display inaccessible. This problem usually happens when connecting a Windows 10 PC to a monitor or TV. While overscan can be frustrating, the good news is that it can be fixed easily. Here are three simple ways to adjust your display and ensure Windows 10 fits perfectly to your screen.
1. Adjust Display Resolution in Windows Settings
Why This Works:
Incorrect display resolution can lead to overscan. Adjusting the resolution ensures that the output matches the native resolution of your monitor or TV, reducing or eliminating overscan.
Steps to Fix:
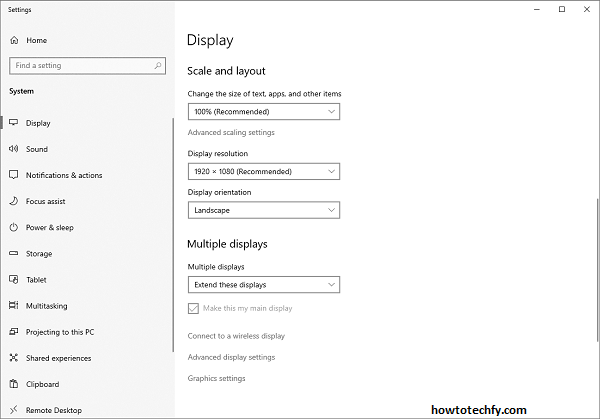
- Right-click on the Desktop – Select Display Settings from the context menu.
- Scroll to Display Resolution – Under the “Display” section, find the Display Resolution dropdown menu.
- Choose the Recommended Resolution – Look for the resolution marked as (Recommended). This is usually the best fit for your screen.
- Apply Changes – Click Apply, and if the screen looks correct, select Keep Changes. If not, try other resolutions until the screen fits properly.

Outcome:
Changing the resolution ensures that Windows 10 outputs the correct display size, reducing the chance of overscan or black bars on the edges.
2. Adjust Scaling in GPU Control Panel (NVIDIA, AMD, Intel)
Why This Works:
Most graphics cards (GPU) have their own control panels that manage display scaling. Adjusting the scaling through the GPU can correct overscan, especially when connected to TVs.
Steps to Fix (NVIDIA):
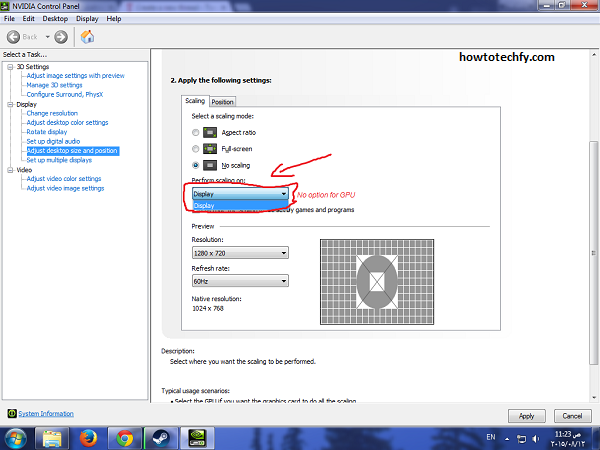
- Right-click on Desktop – Open NVIDIA Control Panel.
- Select Adjust Desktop Size and Position – This can be found under the “Display” tab.
- Choose Full-Screen Scaling – In the Scaling section, choose Full-screen.
- Override Scaling Mode – Check the box for “Override the scaling mode set by games and programs.”
- Apply Changes – Click Apply and check if the screen fits correctly.

Steps to Fix (AMD):
- Open AMD Radeon Software – Right-click on the desktop and choose AMD Radeon Settings.
- Navigate to Display Tab – Find the display section and select Scaling Mode.
- Select Full Panel – This option will ensure the display fits without cutting off the edges.
Steps to Fix (Intel):
- Open Intel Graphics Command Center – Right-click the desktop and choose Graphics Properties.
- Go to Display – Select General Settings and adjust the Scaling to Maintain Aspect Ratio or Full Screen.
- Apply – Save the settings and check if the overscan is fixed.
Outcome:
Using GPU scaling directly addresses overscan by ensuring the display output fits the screen precisely.
3. Adjust TV or Monitor Settings
Why This Works:
Sometimes the issue is not with Windows but with the TV or monitor. Most TVs have an overscan or aspect ratio setting that can be adjusted to correct the issue.
Steps to Fix:
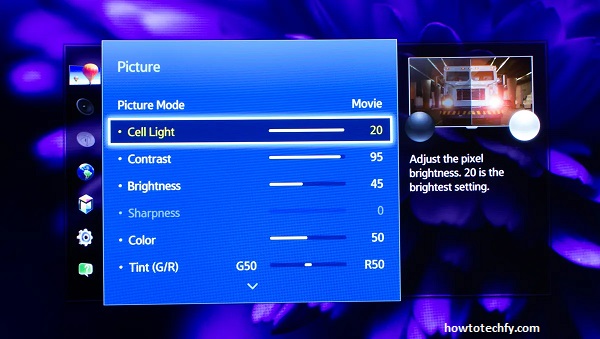
- Access TV/Monitor Menu – Use your TV remote or monitor buttons to access the settings menu.
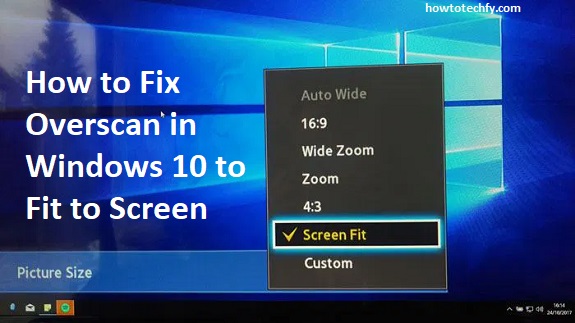
- Locate Aspect Ratio or Picture Size – Look for options like Aspect Ratio, Screen Fit, 1:1, or Just Scan.
- Select Full or Native Mode – Choose an option that displays the full screen without cropping the edges.
- Disable Overscan (if available) – Some TVs have a specific Overscan setting that can be toggled off.

Outcome:
Correcting the aspect ratio or disabling overscan at the source ensures that Windows fits perfectly on the screen without losing any display area.
FAQs About Fixing Overscan in Windows 10
1. What is overscan, and why does it happen?
Overscan occurs when the edges of your screen are cut off, making parts of the display inaccessible. This usually happens when connecting a Windows 10 PC to a TV or monitor with incompatible display settings or incorrect scaling.
2. How can I tell if overscan is affecting my display?
If you notice that the taskbar, icons, or window edges are cut off, or the image looks zoomed in, overscan is likely the issue.
3. How do I fix overscan through Windows settings?
Go to Display Settings by right-clicking on the desktop. Adjust the resolution to the recommended setting and apply the changes. This often fixes the issue.
4. Can overscan be fixed using my TV or monitor settings?
Yes. Many TVs and monitors have options like Aspect Ratio, Just Scan, 1:1, or Full Pixel that correct overscan. Access your TV’s settings and look for these options under the picture or display section.
5. What if adjusting the resolution doesn’t fix the overscan?
If resolution changes don’t help, try adjusting scaling options in your GPU control panel (NVIDIA, AMD, or Intel). This allows you to override display scaling and fit the screen properly.
6. How do I access my GPU control panel to fix overscan?
- NVIDIA: Right-click the desktop and choose NVIDIA Control Panel. Go to Adjust Desktop Size and Position.
- AMD: Right-click the desktop, open AMD Radeon Software, and adjust the Scaling Mode under the display tab.
- Intel: Right-click the desktop and open Graphics Properties or Intel Graphics Command Center. Adjust the scaling options.
7. What is the best resolution to avoid overscan?
Always select the recommended or native resolution for your monitor or TV in Display Settings. For TVs, 1920×1080 (1080p) or 3840×2160 (4K) is typically the best choice.
8. Why does overscan happen more often on TVs than monitors?
TVs often apply overscan by default to fit broadcast signals, which may not align perfectly with PC output. Monitors, on the other hand, are designed to display the full image by default.
9. Is there a permanent solution to overscan?
Yes. Once you adjust the resolution, scaling, or TV settings, these changes are typically saved permanently. However, if the issue reappears, double-check your display settings after any Windows updates.
10. Can overscan damage my monitor or TV?
No, overscan is purely a display setting and won’t cause any physical damage to your screen. It’s a configuration issue that can be fixed through software adjustments.
Conclusion
Overscan can be an annoying issue, but by following these three simple methods—adjusting the display resolution in Windows, using GPU control panels, or tweaking the TV/monitor settings—you can easily fix the problem. With the right adjustments, you’ll enjoy a perfectly fitting screen and an enhanced viewing experience.

