Facebook is one of the most popular social media platforms for musicians and bands to connect with fans, promote events, and share new music. Creating a dedicated band page on Facebook is a great way to build your presence online and engage with your audience. Whether you’re using a desktop or mobile device, here’s a step-by-step guide on how to create your band page on Facebook in 4 easy ways.
1. Creating a Band Page on Desktop
To create a band page on Facebook from a desktop, follow these simple steps:
- Log into Facebook: Open your browser and go to www.facebook.com. Log in using your personal account. If you don’t have a Facebook account, create one first.
- Go to the Create Page Section: On the left-hand side of your Facebook homepage, click on the menu button (three horizontal lines). Select Pages, then click on the Create New Page button.
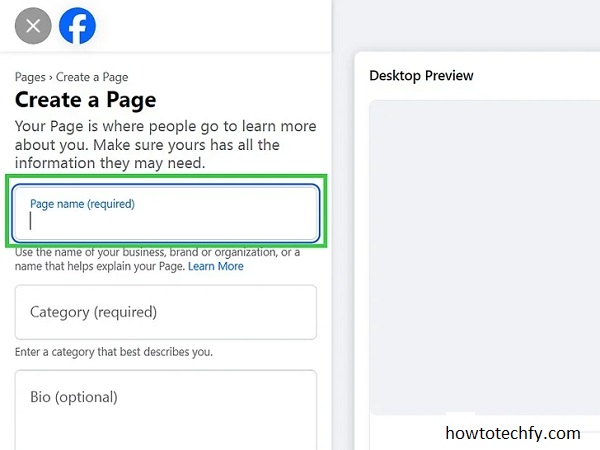
- Fill in Your Band’s Information: You’ll be prompted to fill in details about your band:
- Page Name: Enter your band’s name.
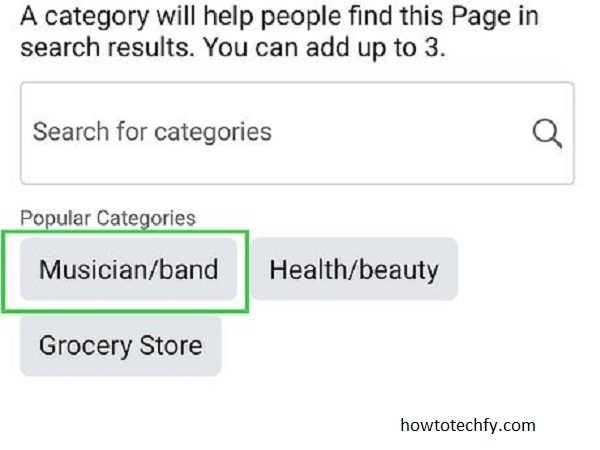
- Category: Start typing “Band” or “Musician/Band” and select the appropriate category from the dropdown menu.
- Description: Add a brief description of your band, including the type of music you play, band history, or any other important details.

- Add Profile and Cover Photos: You’ll be asked to upload a profile picture (typically your band logo or a group photo) and a cover photo (this could be an album cover, band photo, or promotional image).
- Customize Your Page: After creating your page, you can further customize it by adding additional information such as your website link, contact info, and more. You can also invite your friends to like the page to get started.
2. Creating a Band Page on Mobile (Using the Facebook App)
Creating a band page using the Facebook mobile app is quick and easy. Here’s how you can do it:
- Open the Facebook App: Launch the Facebook app on your smartphone and log in to your personal account.
- Go to the Menu: Tap the three horizontal lines in the top right corner (for Android) or the bottom right (for iPhone) to open the menu.
- Create a Page: Scroll down and tap on Pages, then tap Create. Choose Get Started to begin creating your band’s page.

- Enter Your Band Information: Similar to the desktop process, enter your band’s name, select the category “Band” or “Musician/Band,” and provide a description. You can also add the band’s website and other contact information.
- Upload Photos: Choose a profile picture and cover photo for your band’s page. The profile picture should be something recognizable like your band logo, while the cover photo can be a high-quality image of your band or a promotional picture.
3. Editing Your Band Page on Desktop
Once your page is created, you can start managing it from your desktop. You can access the page by going to your profile and selecting Pages from the left sidebar. From there, you can:

- Add events or announcements about upcoming shows.
- Post videos, photos, or updates about your music.
- Respond to fan comments and messages.
- Adjust the settings to control privacy and notifications.
4. Editing Your Band Page on Mobile
The mobile app also offers features to manage your band’s page:

- Tap on the Menu icon and select Pages to find your band’s page.
- You can easily create new posts, reply to messages, and update your page’s information.
- Use the Insights feature to track the performance of your posts, learn about your audience, and adjust your content accordingly.
FAQs
1. Why should I create a band page on Facebook?
A band page on Facebook helps you build a dedicated online presence, allowing you to connect directly with your fans. It’s an ideal platform to promote your music, announce upcoming events, engage with followers, and expand your audience.
2. Do I need a personal Facebook account to create a band page?
Yes, you need a personal Facebook account to create a band page. However, your band’s page will be separate from your personal account, and the public will only see your band’s content, not your personal profile.
3. How do I change the name of my band page after creating it?
To change your band page’s name:
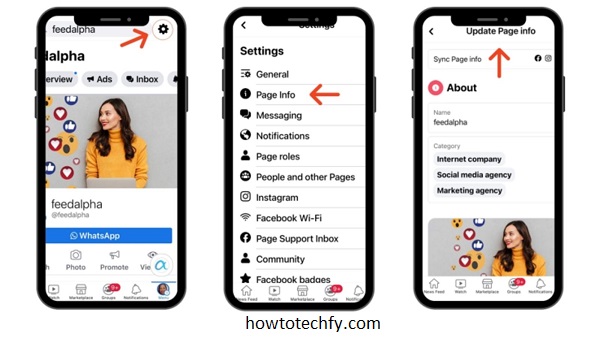
- Go to your page and click on Settings.
- Select Page Info from the left-hand menu.
- Click on the Edit button next to the Page Name field and enter the new name. Note that Facebook has guidelines about changing your page name, and frequent changes may not be allowed.
4. Can I link my band’s website to the page?
Yes, you can add your band’s website, as well as other contact information, in the Page Info section. Simply go to the About section of your page and include links to your website, social media profiles, and other important resources.
5. How can I grow my band’s following on Facebook?
To grow your band’s following on Facebook:
- Post regularly, including videos, photos, and music updates.
- Engage with your fans by responding to comments and messages.
- Run Facebook ads to promote your page to a wider audience.
- Share behind-the-scenes content, live streams, and special offers to make your page more interactive and exciting.
6. How do I post videos or music on my band page?
To post videos or music:
- Go to your band page and click Create Post.
- Choose to upload a video, photo, or a link to your music.
- Add a description, hashtags, and tag relevant people or pages. Once published, your video or music will be available for your followers to engage with.
7. Can I invite people to like my band’s page?
Yes, you can invite your friends, family, and existing followers to like your band page. After your page is set up, Facebook will give you the option to invite people to follow your page. You can also share the page link on your other social media platforms.
8. How do I manage comments and messages on my band’s page?
You can manage comments and messages by:
- Going to your band’s page and clicking on the Inbox tab to respond to direct messages.
- Moderating comments by going to the Activity section and managing any inappropriate or offensive content.
9. Can I link my Instagram or YouTube to my Facebook band page?
Yes, you can link both Instagram and YouTube to your Facebook band page. In the Page Info section, you can add your Instagram handle and YouTube link, making it easy for fans to find all your content across different platforms.
10. How do I see insights or analytics for my band’s page?
To access Facebook insights:
- Go to your band page and click Insights from the top menu.
- You can view metrics like page views, engagement rates, and audience demographics, which will help you understand your followers and the content they interact with.
11. How do I delete or deactivate my band page?
If you want to delete or deactivate your band page, go to Settings, then General. At the bottom, you’ll see the option to either Deactivate or Delete your page permanently. Note that deactivating will make the page temporarily unavailable, while deleting is permanent.
Conclusion
Creating a Facebook band page is an essential tool for musicians and bands looking to engage with fans and promote their music. Whether you’re using a desktop or mobile device, Facebook’s intuitive setup process makes it simple to get started. By following these four easy steps, you can create a band page that serves as the center of your online music community. Remember to update your page regularly with new content and engage with your followers to keep them excited about your music.

