Creating an Instagram Reel with photos is an excellent way to showcase your creativity, memories, or promote a product in a fun, engaging format. Unlike traditional posts, Reels offer a unique opportunity to reach a larger audience through short, captivating videos. If you’re looking to make an Instagram Reel using photos, here are five easy steps to follow.
1. Choose Your Photos
The first step in creating an Instagram Reel with photos is selecting the images you want to feature. Since Reels are designed to be short, it’s important to choose photos that tell a story or convey a specific theme. You can use vacation pictures, personal moments, product photos, or even artwork—anything that can capture attention quickly. Aim to keep the number of images manageable. Typically, you’ll want between 5 to 10 photos for a 15-30 second Reel.

Pro Tip: Try to choose images that vary in composition and color to keep things visually interesting. The diversity of photos will maintain the viewer’s attention.
2. Open Instagram and Access the Reel Feature
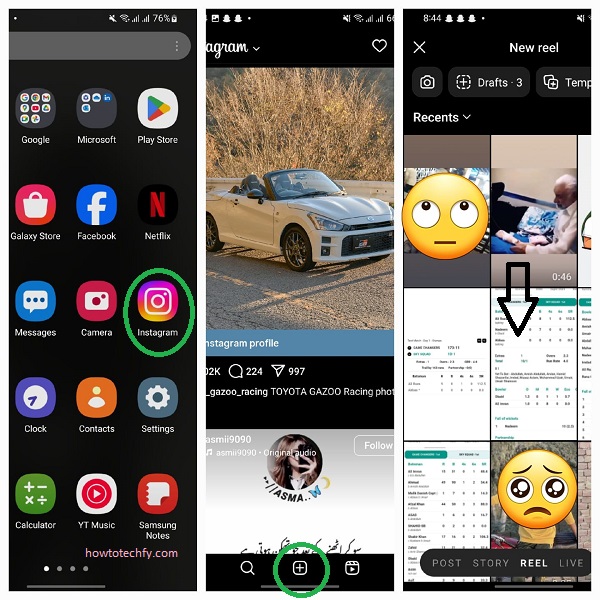
Once you have your photos ready, it’s time to open Instagram. Tap the ‘+’ icon at the top of your profile page and select Reel from the options. This will take you to the Reel creation screen where you can begin building your video.

Tip: Make sure your Instagram app is up to date to access the latest features, including any new editing tools or music options for Reels.
3. Upload Your Photos
To create a photo-based Reel, tap on the gallery icon in the bottom-left corner. This will open your phone’s gallery, allowing you to select the photos you want to include. You can choose photos one at a time or upload several at once. Once selected, Instagram will automatically arrange them in sequence. You can rearrange them if necessary by dragging them in the timeline.

Pro Tip: You can also use video editing apps like Canva or InShot to create a photo slideshow before uploading it to Instagram.
4. Add Music and Effects
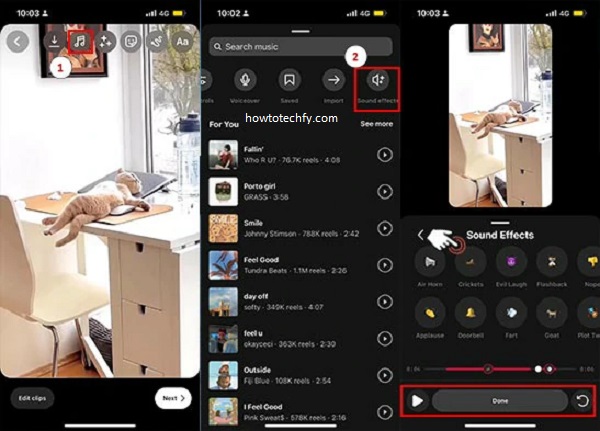
Music is an essential element of Instagram Reels, as it can set the mood and make the content more engaging. After uploading your photos, tap on the music icon at the top of the screen. You can search for songs, sounds, or use your own audio. Instagram offers a variety of tracks, from trending hits to instrumental background music. Choose a song that complements the mood of your photos.

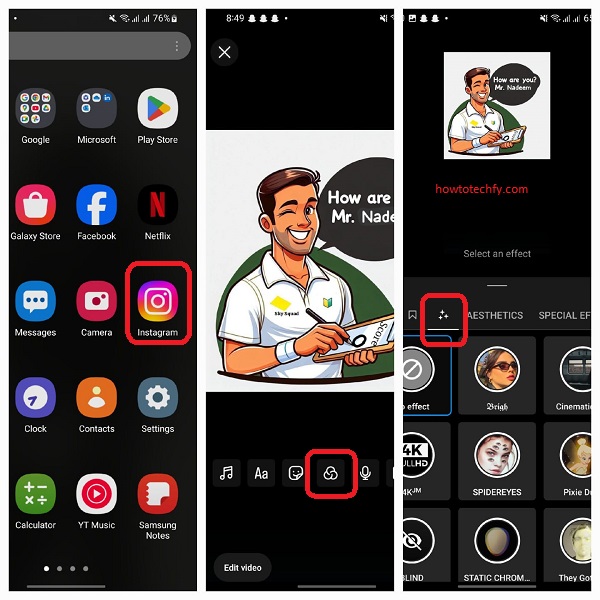
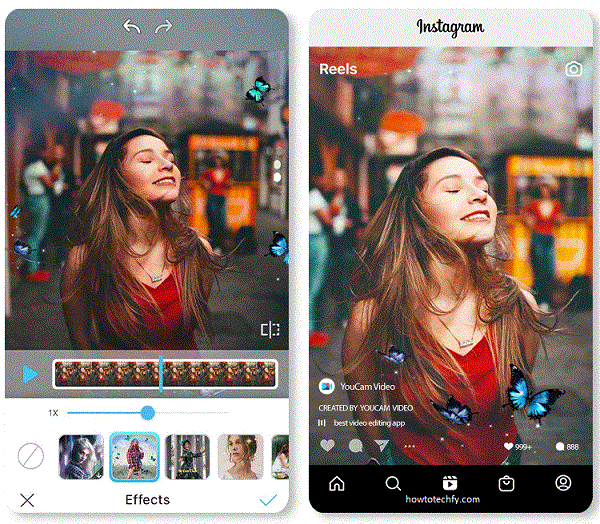
Additionally, Instagram offers a variety of effects and filters to enhance your Reel. You can add transitions, text overlays, or other effects that make your photos come alive. Experiment with different filters to find one that fits your style.
5. Edit Your Reel
After adding music and effects, you can fine-tune your Reel to make it stand out. Tap the scissors icon to adjust the length of each photo and determine how long they will stay on the screen. Most people prefer shorter clips (2-3 seconds per photo) to keep the content dynamic and engaging.

Instagram also lets you adjust the speed of your Reel, add text, or even include stickers for additional flair. Be mindful of the pacing to make sure the photos transition smoothly with the music. If you’re telling a story, try to sync the photos with the beat of the music for a more polished look.
Final Step: Share Your Reel
Once you’re satisfied with your creation, tap Next to proceed to the sharing screen. Add a catchy caption, relevant hashtags, and tag people if necessary. You can choose to share your Reel to your feed, in your stories, or just as a standalone post.
Pro Tip: Posting your Reel at optimal times when your audience is most active can increase its visibility. Instagram’s insights can help you determine the best times to post.
FAQs
1. How do I add multiple photos to a single Instagram Reel?
To add multiple photos to a Reel, tap the gallery icon when creating your Reel. This will open your photo gallery, where you can select multiple images at once. After selecting them, Instagram will arrange them in sequence, and you can adjust the order by dragging the photos around.
2. How long can my Instagram Reel be when using photos?
Instagram Reels can be anywhere from 15 seconds to 90 seconds long. When using photos, it’s best to keep each photo displayed for about 2-3 seconds to maintain a fast pace and keep your audience engaged. You can adjust the duration of each photo by tapping the scissors icon while editing.
3. Can I use my own music in Instagram Reels?
Yes, Instagram allows you to use music from its library or upload your own audio. To add music, tap the music icon at the top of the screen, where you can search for a song or use your own sound clip. If you prefer to use your own audio, you can record it or upload it to Instagram first.
4. How do I create a smooth transition between photos in a Reel?
To create smooth transitions between photos, try using Instagram’s built-in effects or editing tools. You can add fade-in or fade-out effects or use third-party apps like InShot or Canva to create smoother transitions before uploading your photos to Instagram.
5. Can I add text or stickers to my photo-based Reels?
Yes, Instagram allows you to add text, stickers, and other elements to your Reel. After uploading your photos, tap the text icon to add text, or use the stickers icon for animated effects, emojis, and more. You can adjust the timing of text and stickers to appear at specific points in your video.
6. What is the best photo size for Instagram Reels?
Instagram Reels are optimized for vertical videos, so it’s best to use portrait mode photos with a 9:16 aspect ratio (1080×1920 pixels). This ensures your images fit the screen properly without being cropped.
7. How do I get more views on my Instagram Reel with photos?
To increase the chances of your Reel getting more views, use relevant hashtags to reach a wider audience, choose trending music, and post at times when your followers are most active. Engaging with your audience through comments and shares can also boost visibility.
8. Can I edit my Reel after posting it?
Once a Reel is posted, you cannot directly edit the photos, music, or text. However, you can delete the Reel and upload a new version if you want to make significant changes. For minor edits, such as changing the caption or hashtags, you can tap the three dots on the Reel and select Edit.
9. Is there a way to add transitions between my photos without third-party apps?
While Instagram doesn’t offer a wide variety of advanced transitions, you can experiment with the effects library and use the split-screen feature to create simple transitions. Additionally, syncing your photo changes to the beat of the music can create a more seamless flow between the images.
10. How do I use a photo slideshow in Instagram Reels?
To make a slideshow in Instagram Reels, upload your photos, arrange them in your desired order, and adjust the duration for each one. You can add music, effects, and text to enhance the slideshow. It’s also possible to use external editing apps like Canva or Adobe Spark to create a pre-edited slideshow and upload it as a video to Instagram.
Conclusion
Making an Instagram Reel with photos doesn’t have to be complicated. By choosing the right photos, adding music and effects, and editing them to fit your story, you can create an engaging and fun Reel that resonates with your audience. Whether you’re showcasing your life, promoting a business, or just having fun, these easy steps will help you produce high-quality Reels that stand out on Instagram.

