TikTok has become one of the most popular social media platforms in recent years, known for its engaging videos and creative effects. Users love to experiment with a wide variety of filters and effects to enhance their content, but there are times when you might want to revert to the natural, unfiltered version of your video. Whether you’re looking to show your real self or want to remove an effect that doesn’t quite work, knowing how to remove TikTok filters and effects is an essential skill.
In this article, we’ll explore two simple methods to remove filters and effects from your TikTok videos, allowing you to take control of your content and give it a more authentic touch.
Method 1: Removing Filters and Effects Before Recording

One of the simplest ways to avoid having to remove filters or effects after recording is by not applying them in the first place. However, if you’ve already chosen a filter or effect before hitting the record button, don’t worry! TikTok allows users to easily turn off or change these elements before you even start recording your video.
Steps to Remove Filters and Effects Before Recording:
- Open the TikTok App: Launch TikTok on your mobile device and tap on the plus icon (+) at the bottom of the screen to begin creating a new video.

- Choose Your Camera Settings: Before recording, you’ll see a variety of options on the screen, including filters, effects, and sounds. At this point, you can disable any filter or effect that you don’t want to use.
- To remove a filter: Tap on the “Filters” button located on the right side of the screen. Once the filter options appear, scroll through them and select the “None” option (usually the first option on the list). This will turn off any active filter, allowing you to record with the natural look.
- To remove effects: Tap the “Effects” button, which is usually found on the left side of the screen. Here, you can browse through all available effects. If one is currently applied, it will be highlighted. To remove it, simply tap on the “None” or close the effect section.
- Double-Check Your Video: Before hitting the record button, take a moment to double-check your video preview. Make sure that there are no unwanted filters or effects active, and if everything looks good, you can go ahead and record your video.
- Start Recording: Once you’re happy with the settings, tap the red button to start recording your TikTok video. Without any filters or effects applied, you’ll be capturing your content in its most natural form.
Method 2: Removing Filters and Effects After Recording
If you’ve already recorded a video and ended up with a filter or effect that you don’t like, you can still easily remove it post-recording. TikTok offers an editing feature that allows you to modify your video after recording, including removing or changing the filters and effects you applied during the shooting process.
Steps to Remove Filters and Effects After Recording:

- Record Your Video: Open the TikTok app, and tap the plus icon to start recording your video as usual. Apply any filters or effects during the recording process if you wish, but if you change your mind afterward, don’t worry — you can still modify them.
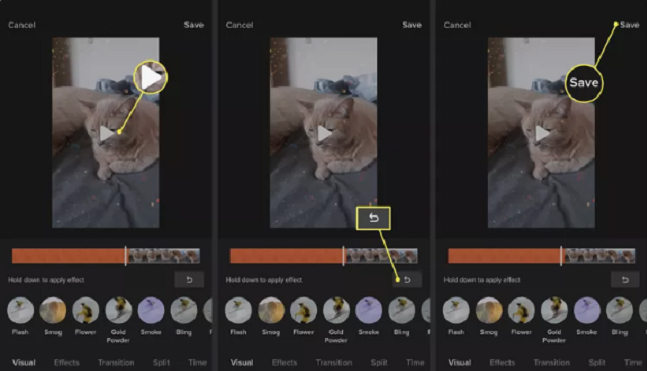
- Go to the Editing Screen: After recording your video, you’ll be taken to the editing screen where you can make adjustments. Here, you’ll see a series of editing tools along the bottom of the screen.
- Remove the Filter: If you added a filter to your video during the recording process, tap on the “Filters” option at the right of the screen. The currently applied filter will be displayed. Select the “None” filter option to remove it from your video. This will return your video to its original, unfiltered state.
- Remove the Effect: If you used an effect during recording, it might still be visible on your video. To remove it, tap on the “Effects” option located at the left side of the editing screen. If the effect is applied, it will appear as the active selection. To disable it, simply choose “None” to eliminate the effect from your video.
- Preview Your Video: Once you’ve removed the filter and effect, take a moment to preview your video. You should now see the video in its original, unaltered form, free from any filters or effects.
- Make Additional Edits (Optional): If desired, you can make additional edits to your video, such as trimming, adding music, or adjusting the speed, using the other tools available on the editing screen.
- Post Your Video: Once you’re satisfied with the changes, tap on the “Next” button to proceed to the post screen. Here, you can add a caption, hashtags, and adjust other settings before sharing your video with your followers.
FAQs
1. How do I remove filters before recording a video on TikTok?
To remove filters before recording, tap the “Filters” button on the right, then select the “None” option to disable any active filter. You can proceed to record your video without any filter applied.
2. Can I remove effects before recording a TikTok video?
Yes, tap the “Effects” button on the left side of the screen, then choose the “None” option to disable any active effect before you start recording.
3. How do I remove filters after recording a TikTok video?
After recording, go to the editing screen, tap “Filters” on the right, and select the “None” filter option to remove any filter applied to your video.
4. How do I remove effects after recording a TikTok video?
On the editing screen, tap the “Effects” button on the left, and choose the “None” option to remove any effects from your video.
5. Can I still make edits after removing filters or effects?
Yes, once you remove filters and effects, you can make additional edits like trimming, adding music, or adjusting the speed before posting your video.
6. Why should I remove filters or effects from my TikTok video?
Removing filters and effects can help showcase your authentic self, or if you’re not happy with the effect or filter you used, you can easily revert to a more natural look.
Conclusion
Removing filters and effects from your TikTok videos is a simple and effective way to maintain a more authentic and natural appearance. Whether you choose to disable filters and effects before recording or make adjustments after recording, TikTok offers easy-to-use tools for both options. By following the steps outlined in this guide, you can effortlessly control the look of your content, ensuring that your videos reflect your true self. Experimenting with different styles and effects is part of the fun, but when it’s time to go back to basics, these methods allow you to make quick changes without hassle. Enjoy creating, editing, and sharing your TikTok videos just the way you want them!

