Windows 10 offers a powerful tool called File History that allows you to back up and restore personal files effortlessly. Whether you’re concerned about data loss, accidental file deletion, or want to keep multiple versions of your files for easy retrieval, File History provides an easy-to-use and automated solution. In this ultimate guide, we’ll show you 3 easy ways to unlock the full potential of File History and protect your valuable data.
1. Set Up File History for Automatic Backups
The first step in unlocking the power of File History is to enable it. Once activated, File History will automatically back up your files on a regular basis. Here’s how to set it up:
- Step 1: Open the Start menu and type “Settings”. Click on the Settings app.
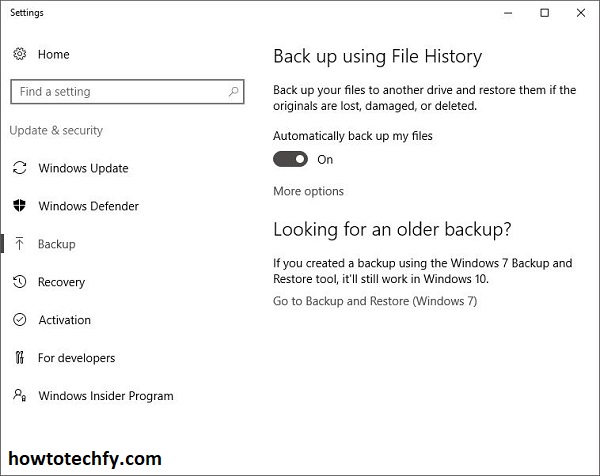
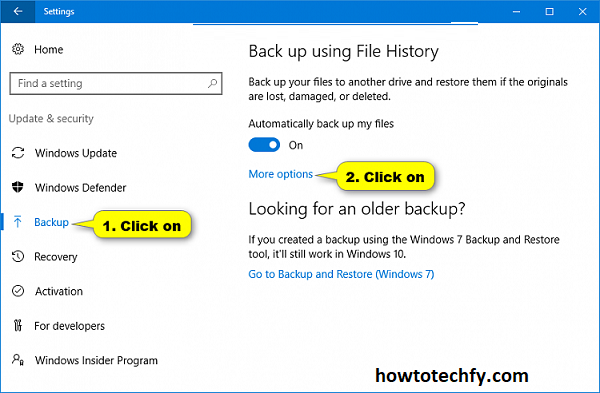
- Step 2: Navigate to Update & Security > Backup.
- Step 3: Under the “Back up using File History” section, click Add a drive and select an external drive, network location, or another storage device where you want your backups to be stored.
- Step 4: After selecting a drive, toggle the “Automatically back up my files” option to On. This will enable File History to regularly back up your files.

Once enabled, File History will begin backing up files from default folders like Documents, Pictures, Videos, and Desktop, as well as files you place in custom folders. The system automatically saves the backup versions every hour, but you can change the frequency and retention period based on your needs.
Tip: Make sure the external storage device or network location has enough free space for the backup. File History will continue to save versions of your files until the storage is full, at which point it will delete the oldest versions.
2. Customize What Files to Back Up and How Often
By default, File History backs up the most important files in your user folder. However, you can customize this to include additional folders or exclude others to better suit your needs.
- Step 1: Go to Settings > Update & Security > Backup > More options.
- Step 2: Under “Back up these folders,” you can click Add a folder to include other important files or folders that are not automatically backed up.
- Step 3: You can also exclude folders that you don’t want to back up by clicking Exclude these folders and selecting the folders you wish to remove from the backup.
- Step 4: Adjust the backup frequency by choosing from options like Every 10 minutes, Every hour, or Daily, and set how long the versions of your files should be kept—forever, until space is needed, or a custom duration.

Customizing your backup options ensures that you’re not wasting space on unimportant files while also protecting everything you need. This flexibility allows File History to fit seamlessly into your daily workflow.
3. Restore Files and Folders with Ease
One of the most powerful features of File History is the ability to restore previous versions of files or entire folders. This is particularly helpful if you’ve accidentally deleted or modified a file and want to recover an earlier version.
- Step 1: Open File Explorer and navigate to the folder where your file was stored.
- Step 2: Right-click on the folder and select Restore previous versions. You will see a list of available backups.
- Step 3: Select the version you want to restore and click Restore. You can also preview the file or folder before restoring it to ensure it’s the correct version.

If you need to recover a file that was deleted, you can still find it in the previous versions and restore it to its original location or a new one.
Tip: You can also restore entire folders or specific files via the Control Panel by going to System and Security > File History and clicking Restore personal files.
FAQs: Unlocking the Power of File History in Windows 10
1. What is File History in Windows 10?
File History is a backup feature in Windows 10 that automatically saves copies of your personal files, such as documents, pictures, and videos, to an external drive or network location. It allows you to recover previous versions of files, helping to protect against accidental deletion, corruption, or modification.
2. How often does File History back up my files?
By default, File History backs up your files every hour. However, you can customize the frequency of backups by going to Settings > Update & Security > Backup > More options and adjusting the backup schedule to suit your needs.
3. Can I use File History to back up all types of files?
File History primarily backs up files in your user folders, such as Documents, Pictures, Videos, and Desktop. However, you can add additional folders to the backup by customizing the settings in More options under Backup. It does not back up system files or apps.
4. Can I use File History with a network drive?
Yes, you can use a network drive or shared network location for File History backups. When setting up File History, simply select a network location or drive to store your backups. This is a good option if you don’t want to rely on local storage like an external hard drive.
5. How do I restore files using File History?
To restore files, navigate to the folder where the file was stored, right-click, and select Restore previous versions. You’ll see a list of available backup versions. Select the version you wish to restore, and click Restore to recover the file or folder to its original or a new location.
6. Does File History back up my system or installed programs?
No, File History only backs up personal files and does not include system files, settings, or installed programs. For a complete system backup, you can use Windows 10’s System Image Backup or other third-party backup software.
7. How do I change where my File History backups are stored?
To change the location of your File History backups, go to Settings > Update & Security > Backup and click More options. Then, select Stop using this drive and choose a new drive or network location to store your backups.
8. How long does File History keep backup versions?
File History retains backup versions according to your settings. You can choose to keep files forever, until space is needed, or for a custom duration. The default setting is to keep files until space is needed, at which point older versions are automatically deleted.
9. Can I use File History to back up my entire computer?
File History only backs up personal files in your user folders and does not create a full system backup. If you want to back up the entire system, including operating system files and installed apps, you should consider using the Windows Backup feature or a third-party backup solution.
10. What happens if my external drive is disconnected?
If your external drive is disconnected, File History will pause the backups until the drive is reconnected. Once the drive is back online, File History will resume backing up files at the next scheduled interval.
11. Is File History secure?
File History provides basic file protection but is not encrypted by default. For enhanced security, especially if you’re using an external drive or network location, you may want to use additional encryption software to protect your backups.
12. Can I use File History with OneDrive?
While File History does not back up files stored in OneDrive directly, files stored locally on your device that are synced with OneDrive will be backed up. However, OneDrive offers its own version history and file recovery options, which can serve as an additional layer of protection for your cloud-based files.
Conclusion
File History in Windows 10 is an incredibly useful tool for protecting your files and providing peace of mind. By setting it up for automatic backups, customizing what to back up, and knowing how to restore your files, you can ensure that your important data is always safe. Whether you’re recovering from a mistake or simply need access to older versions of a file, File History makes it simple to unlock the full potential of your Windows 10 system’s backup capabilities. Start using File History today to safeguard your personal data and improve your workflow.

