

The On-Screen Keyboard (OSK) in Windows 10 is a useful feature that allows you to interact with your computer using an on-screen keyboard. This is especially helpful when your physical keyboard is not working, you’re using a touchscreen device, or you simply prefer to use a virtual keyboard. Enabling the on-screen keyboard in Windows 10 is quick and easy. Here are four simple ways to do so.
1. Use the Start Menu to Enable the On-Screen Keyboard
One of the quickest ways to open the On-Screen Keyboard in Windows 10 is through the Start menu. This method is perfect for users who are familiar with navigating the Start menu.
How to Enable the On-Screen Keyboard via the Start Menu:
- Click the Start Menu: Click the Windows icon in the bottom-left corner of your screen, or press the Windows key on your keyboard.
- Search for On-Screen Keyboard: In the search bar, type “On-Screen Keyboard.”
- Select On-Screen Keyboard: Click on the On-Screen Keyboard from the search results. The virtual keyboard will appear on your screen.
This method is quick and easy for users who are comfortable using the Start menu.
2. Enable the On-Screen Keyboard Using Keyboard Shortcut
For a faster way to bring up the On-Screen Keyboard, Windows 10 has a dedicated keyboard shortcut. This option is perfect for when you need the virtual keyboard quickly without navigating through menus.
How to Enable the On-Screen Keyboard Using a Keyboard Shortcut:
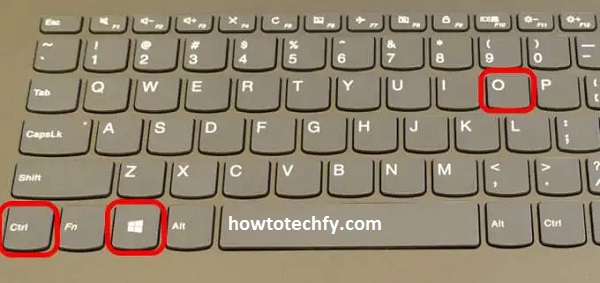
- Press the Windows + Ctrl + O keys: Simultaneously press the Windows key, the Ctrl key, and the O key on your keyboard.
- The On-Screen Keyboard will immediately pop up on your screen.
This keyboard shortcut is one of the quickest and most efficient ways to open the On-Screen Keyboard, especially if you are unable to use your physical keyboard for some reason.
3. Turn on the On-Screen Keyboard via Settings (Ease of Access)
Windows 10 includes an accessibility feature called Ease of Access, which allows you to turn on the On-Screen Keyboard permanently or whenever you need it. This option is especially useful if you need regular access to the virtual keyboard.
How to Enable the On-Screen Keyboard Through Ease of Access Settings:
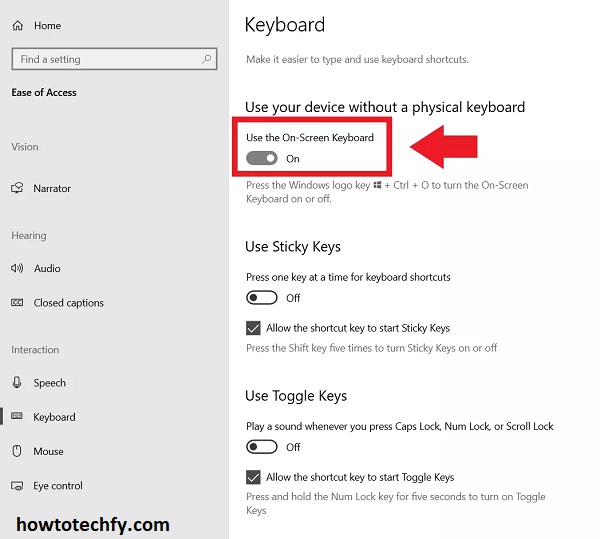
- Open Settings: Click the Start Menu, and then click on the Settings gear icon, or press Windows + I.
- Navigate to Ease of Access: In the Settings window, click on Ease of Access.
- Go to Keyboard Settings: In the left sidebar, click on Keyboard under the “Interaction” section.
- Turn on the On-Screen Keyboard: Toggle the switch under Use the On-Screen Keyboard to the On position.
- The On-Screen Keyboard will now appear on your screen.

Once enabled through Ease of Access, the On-Screen Keyboard will stay visible until you manually close it. This method is great if you need it up for long periods.
4. Enable the On-Screen Keyboard Through the Control Panel
For users who prefer the traditional Control Panel over the Settings app, you can also enable the On-Screen Keyboard using the classic Control Panel.
How to Enable the On-Screen Keyboard Using the Control Panel:
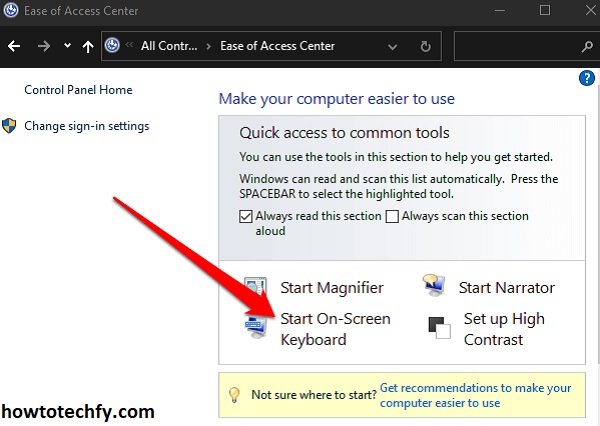
- Open Control Panel: Press Windows + R to open the Run dialog. Type control and press Enter to open the Control Panel.
- Access the Ease of Access Center: In the Control Panel, select Ease of Access and then click on Ease of Access Center.
- Select the On-Screen Keyboard Option: Under the “Explore all settings” section, click on Use the On-Screen Keyboard.
- The On-Screen Keyboard will now open on your screen.
This method is especially useful for users who prefer the classic interface of the Control Panel rather than the new Settings app in Windows 10.
Frequently Asked Questions (FAQs) About Enabling the On-Screen Keyboard in Windows 10
1. What is the On-Screen Keyboard in Windows 10?
The On-Screen Keyboard (OSK) is a virtual keyboard that appears on your screen. You can use it by clicking on the keys with your mouse or touchscreen, making it useful when your physical keyboard is not working or if you’re using a touchscreen device.
2. How can I quickly open the On-Screen Keyboard in Windows 10?
The fastest way to open the On-Screen Keyboard is by pressing the keyboard shortcut Windows + Ctrl + O. This will instantly open the virtual keyboard without navigating through menus.
3. Can I keep the On-Screen Keyboard open permanently?
Yes, you can keep the On-Screen Keyboard open for as long as you need. To do this, go to Settings > Ease of Access > Keyboard and toggle the switch for Use the On-Screen Keyboard to “On.” It will remain visible until you manually close it.
4. How do I turn on the On-Screen Keyboard from the Start menu?
To enable the On-Screen Keyboard from the Start menu, click on the Start button, type On-Screen Keyboard in the search bar, and select it from the search results. The virtual keyboard will appear on your screen.
5. What if I can’t find the On-Screen Keyboard in the Start menu search?
If you cannot find the On-Screen Keyboard through the Start menu search, you can access it through Settings or Control Panel. You can also try typing “osk” in the Run dialog (Windows + R) to open it directly.
6. Can I use the On-Screen Keyboard if I have a touch-enabled device?
Yes, the On-Screen Keyboard is particularly useful for touch-enabled devices. You can use your fingers or a stylus to tap the keys directly on the screen, making it ideal for tablets, laptops with touchscreens, or convertible devices.
7. How do I disable the On-Screen Keyboard when I no longer need it?
To disable the On-Screen Keyboard, you can simply close the on-screen window. If you enabled it through Ease of Access, you can go back to Settings > Ease of Access > Keyboard and toggle the Use the On-Screen Keyboard switch to “Off.”
8. Is the On-Screen Keyboard accessible with a mouse or touchpad?
Yes, the On-Screen Keyboard can be used with a mouse or touchpad. You can click on the keys using your mouse or trackpad, making it useful if your physical keyboard is not functioning.
9. Can I customize the On-Screen Keyboard in Windows 10?
The On-Screen Keyboard in Windows 10 offers limited customization options. You can adjust the keyboard’s size, change the typing feedback, or enable features like predictive text or key sounds. However, it doesn’t offer full customization like third-party virtual keyboards.
10. What should I do if the On-Screen Keyboard isn’t working?
If the On-Screen Keyboard isn’t opening or working properly, try restarting your computer. You can also check for updates in Settings > Update & Security. If the issue persists, running the Windows Troubleshooter or checking your system for issues may help.
Conclusion
The On-Screen Keyboard in Windows 10 is a versatile tool that can be quickly enabled through several methods. Whether you prefer using the Start menu, a keyboard shortcut, Ease of Access settings, or the traditional Control Panel, you have various options to bring up the virtual keyboard. These methods are especially helpful when your physical keyboard is malfunctioning, or if you’re using a touch-enabled device and need an on-screen input method. With these easy steps, you can ensure that you always have access to an on-screen keyboard whenever you need it.